Showing posts with label Gifts. Show all posts

Monday, February 14, 2011

Kid's Birthday Gift Idea...Dollar Tree style

Here is what I have been putting together for my son's friend's birthday parties. He has been invited to 4 birthday parties in the past month. This is a simple, inexpensive idea. Instead of trying to shop for a toy or a game that we hope they like or don't already have I came up with this idea.

The Movie Gift Certificate package.

What you will need:

Popcorn tubs
(either plastic or cardboard...
I got mine at the thrift store for 25cents each)
Cello Wrap
(I got mine from the Dollar Tree)
Basket Shred
(also from the Dollar Tree)
Movie Theater Sized Candy
(Dollar Tree)
Movie Gift Certificate
(I usually get a $10 one, but obviously you do what is in your price range)


Here are all my supplies.

I find these popcorn tubs all the time at the Thrift stores, but you can also find them at the Dollar Tree or the Dollar Spot at Target. I have also gotten actual popcorn tubs from the movie theater that I buy the gift certificate from.)

 
Basket Shred (I use yellow because it looks like buttered popcorn!) This 1 bag can make 3 gifts usually.

Gift Certificate to our local movie theater.

Here they are all put together.

 I love giving this gift! I would much rather give an "Experience" then a piece of plastic! Especially in the $12 range that I spend total on each one of these.

What about you guys? What unique ideas do you have for Kid's birthday parties that your children are invited too?

Enjoy!!!

Friday, February 11, 2011

Recycled Crayon Hearts for Valentine's Day

This project is really EASY & really THRIFTY!
My kids really enjoy this project. We have made these crayons several times before. They love creating different color combinations and love seeing the end result.

Supplies you will need to get started:
Old Crayons
Muffin Tin/Silicone Mold (any shape or size)
*My heart shape molds came from the Dollar Tree.
Almost every holiday they have them in the coordinating shapes for that season.
I have had the heart molds for a few years now.

This gallon Ziploc bag came from the Salvation Army on one of my Thrift Store outings. 30 cents for this entire bag was a great deal in my book.


You need to peel all the wrappers off the crayons. (This is the time consuming part!)
Then just break them into pieces. If you break a full size crayon in 4 pieces this is the best size to work with but obviously any size will work.
Bake them for about 8 minutes (or until they loose their shape) in a 300' oven.
I put the molds onto a aluminum foil lined cookie sheet just to prevent spills.

Let them cool on the counter for about 15 minutes and then put them in the freezer for another 15-20 minutes until hardened. Then just pop them out.  

Put them in cello bags or package them together with some coloring books for a cute gift.
We are just giving each child one in my son's class for a Valentines day favor.
It cost me next to nothing to make, they kids got to make them themselves & in my opinion they are so much better than all that CANDY they get!

Enjoy!!!


Monday, December 20, 2010

Cute & Easy Thrifty Gifts: Wearable Flower Pins

I was shopping at Bath & Body Works works the other day and came across these super cute gift toppers for $2 each!
The instant I saw them I knew I had to have them, and I had bigger plans than just topping a gift.
I wanted to make some decorative pins to give as gifts!

I already had the supplies I needed to pull this off. (Adhesive Bar pins, thread, and a needle).

I started by cutting off the little ribbons that were attached. Then I added the adhesive backed bar pins. I then sewed the bar pins to give them a bit more stability for wear & tear.

(These last 2 photos were taken by my 7 year old
so they are a bit off centered )
So there you have it....super CUTE, fast & easy Wearable Flower Pins. These would make great last minute gifts for your friends, sisters, moms, aunts, grandmas, even teachers! Great project for those on a budget too!
Enjoy!!!

I am linking up to these FABULOUS Parties:


UndertheTableandDreaming
 

Photobucket


Wednesday, October 20, 2010

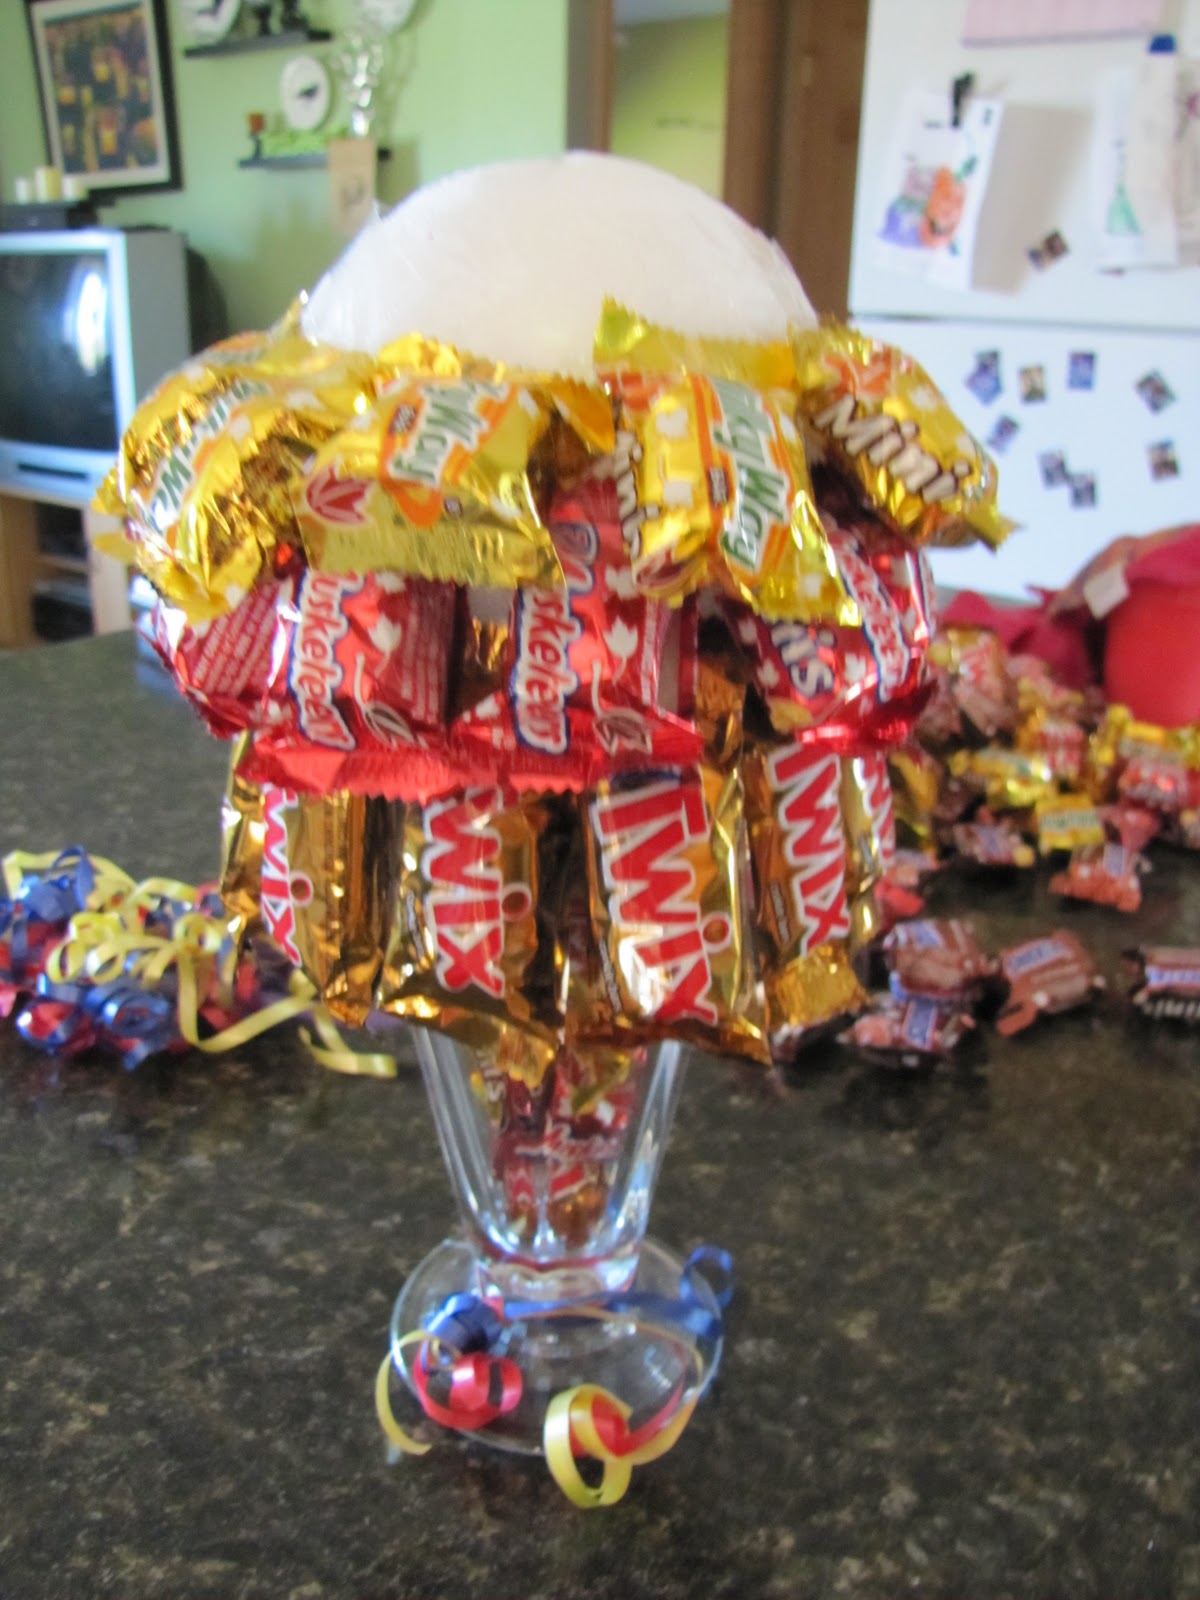
Ice Cream Sundae Candy Bouquet Gift

Well, I try and be the organized Mom, but sometimes, time gets away from me & I am left scrambling at the end. My son had a birthday party he was invited to last week. I had something specific in mind (a game actually) that I wanted to buy for the gift, but do you think for the life of me I could find it anywhere in Winona. After stopping at Walmart, Fleet Farm & Target with no luck, I called Kmart & Shopko to see if they carried it. They didn't either. So here I am at 10am on Friday with nothing & the birthday party is at 4pm.
So I got my creative brain in action. I just picked up our Halloween candy at Target which got me thinking of an idea I had seen recently.
A Candy bouquet!!!!
I know, a kid's dream....a dentist's nightmare, but I just didn't want to buy another piece of plastic. So candy bouquet it is.


Here is the skinny on how to make it!

SUPPLIES:
(Most of these items can be bought at the Dollar Tree, although other than the candy, I had all on hand)
Ice Cream Bowl
Styrofoam Ball
Mini Candy Bars (approximate 65)
2 Drinking Straws
Some curling ribbon

I started out by putting some of the candy bars in the Ice Cream Bowl (about 11).

Then I taped the Styrofoam ball to the top of the bowl.

Then just start taping the candy bars in rows. Start at the bottom & work your way up.


Once you fill up the ball add 2 straws, some decorative ribbon &
WHOLA!!!!


Enjoy!


Wednesday, September 8, 2010

Name Frame Wedding Gift

This past weekend we had the honor of attending a family wedding.
It was a gorgeous day & a beautiful Mississippi riverside, outdoor wedding.
CONGRATULATIONS Tiffany & Phil!
Here's the Happy Couple on their wedding day!
The past few years we have been invited to a ton of weddings (we average like 8 a year). So buying wedding gifts can get costly. To help defray the costs, I started making these name frames as gifts. Each one is personalized to the couple & they are very easy to make. Here is my breakdown on how to make them!

SUPPLIES:
Frame (I buy mine at Walmart $3)
Various Scrapbook Papers & Card stock
Alphabet Stamps
Stamp Pad
Ribbon
Double sided tape
Paper Cutter

SUPPLIES

I start by cutting out my assorted/coordinating scrapbook paper for each letter of their last name. The size varies depending on how many letters in their name. I used 1 1/2 X 2 1/2 for theirs since it only had 5 letters. And then cut out the solid color card stock just a 1/4" bigger all around as well.
I did 1 3/4 X 2 3/4 for the black card stock. I also cut one larger piece that I use for the background. I use the sample paper they put inside your frame for the dimension.
Next I stamp out their name in coordinating ink on white card stock.
Then I cut out each letter.


I then piece it all together with my double sided tape.
And arrange it on the background paper.

I then add my ribbon for accent.
I also type up their first names & there Established wedding date on Microsoft word & print it out (this part is optional, they look good without it too).


I use a paper punch to add this final touch! Mine is from Stampin Up (Word Window Punch: The old style). I just punch the date & name & 2 separate black punches to accent it.
Frame it & WHOLA!!

 Enjoy!

Thursday, September 2, 2010

Quick Personalized Birthday Present Frames

Our family does birthday parties by the season. We have Winter birthdays, Spring birthdays, Summer birthdays & Fall birthdays. So basically we celebrate about 3 months of birthdays for each party. I am also the eldest of all of the grandchildren. So needless to say, I have alot of young cousins & the majority of them are girls! Well when the spring birthday's come around, I have 3 of these young cousin's to get gifts for. Here is what I threw together quick & thrifty for their last birthday (I am a bit behind on posting this....sorry!).

First I got the frames at my local Dollar Tree. I loved that they had a spot for 3 pictures. Here they are before I started.

BEFORE
SUPPLIES:
Dollar Tree Frame
Spray paint (various colors)
Coordinating scrapbook paper (Dollar Tree)
Chipboard accent or wooden accent (Stampin Up)
Adhesive (for the accent piece..I just used my glue gun)
Alphabet Stamp (Stampin Up)
Circle Paper Punch (2 sizes)

I started by taking the guts (glass, backing, cardboard, etc) out of the frame. Then I spray painted them. I choose colors that would match each of the girls bedrooms.

I also spray painted the chipboard accent piece.


I cut out three different pieces of the scrapbook paper to fit in each picture slot, hot glue gunned on the accent piece. Then I cut 2 different size circles with my circle punches. Stamped a Initial with my alphabet stamp and WHOLA!!!
Instant personalized gift for a Tween's bedroom!!!!

AFTER
A close up of all three!


Enjoy!!!