Tuesday, February 15, 2011

ORGANIZATION: Recipe Binder Weekly Challenge #3

Week #3 in the Weekly Challenge is the Recipe Binder.

I have had a recipe binder in my household for over 5 years now. It is where I keep clip its and torn out magazine recipes, recipes from the web, as well as all my tried & true recipes. It is full of recipes from all different sources.

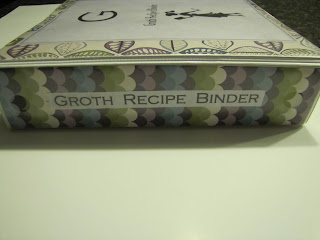
For this challenge, I decided to make it look a bit more pretty. For years it has just been a large white binder. Nothing special. Here is what it looks like now.
I got the scrapbook paper at Target for a pack of coordinating sheets for 99 cents.
The spine.

My dividers are just decorative manila folders cut in half and 3 hole punched.

My dividers that make up my binder are:
Appetizers
Beverages
Soups
Salads/Fruits
Vegetables
Breads/Muffins
Breakfast
Meats/Main Dishes
Pasta
Side Dishes
Desserts (pies, cookies, cakes)
This N That (spice mixes, misc)
Kids (Foods that are catered for kids)
Parties (Food for parties & decorating ideas)
Canning/Freezing
Birds (I make homemade wild bird treats)
Food Gifts (jar mixes)
Cleaning (handmade cleaners)

A close up.

Here is a peek at what it looks like inside.

Here's another page.

Here is what I use for recipe cards to make them into printer friendly versions to include in my binder.
Over at Skip to my Lou's she has a AWESOME "Recipe Card Maker". I made these over there! Aren't they are SOOO Cute! 
Go check it out now.


Here are all three of my binders: The Recipe Binder, Meal Planning Binder & a Cookbook I made up several years ago with my Mom's family recipes.

Enjoy!!!


I am linking up to these FABULOUS Parties:

Monday, February 14, 2011

Storing My Cooking Utensils

Kitchen Organization:

This is how I store my Cooking utensils:


Check out all these other cool ways to store your cooking utensils over at "A Bowl Full of Lemons" Blog.

Enjoy!!!


I am linking up to these FABULOUS Parties:


I prefer storing them this way as to easy access. They are easy to put away after I take them out of the dishwasher, as well as easy to find and grab when I need them the most!

Kid's Birthday Gift Idea...Dollar Tree style

Here is what I have been putting together for my son's friend's birthday parties. He has been invited to 4 birthday parties in the past month. This is a simple, inexpensive idea. Instead of trying to shop for a toy or a game that we hope they like or don't already have I came up with this idea.

The Movie Gift Certificate package.

What you will need:

Popcorn tubs
(either plastic or cardboard...
I got mine at the thrift store for 25cents each)
Cello Wrap
(I got mine from the Dollar Tree)
Basket Shred
(also from the Dollar Tree)
Movie Theater Sized Candy
(Dollar Tree)
Movie Gift Certificate
(I usually get a $10 one, but obviously you do what is in your price range)


Here are all my supplies.

I find these popcorn tubs all the time at the Thrift stores, but you can also find them at the Dollar Tree or the Dollar Spot at Target. I have also gotten actual popcorn tubs from the movie theater that I buy the gift certificate from.)

 
Basket Shred (I use yellow because it looks like buttered popcorn!) This 1 bag can make 3 gifts usually.

Gift Certificate to our local movie theater.

Here they are all put together.

 I love giving this gift! I would much rather give an "Experience" then a piece of plastic! Especially in the $12 range that I spend total on each one of these.

What about you guys? What unique ideas do you have for Kid's birthday parties that your children are invited too?

Enjoy!!!

Friday, February 11, 2011

Recycled Crayon Hearts for Valentine's Day

This project is really EASY & really THRIFTY!
My kids really enjoy this project. We have made these crayons several times before. They love creating different color combinations and love seeing the end result.

Supplies you will need to get started:
Old Crayons
Muffin Tin/Silicone Mold (any shape or size)
*My heart shape molds came from the Dollar Tree.
Almost every holiday they have them in the coordinating shapes for that season.
I have had the heart molds for a few years now.

This gallon Ziploc bag came from the Salvation Army on one of my Thrift Store outings. 30 cents for this entire bag was a great deal in my book.


You need to peel all the wrappers off the crayons. (This is the time consuming part!)
Then just break them into pieces. If you break a full size crayon in 4 pieces this is the best size to work with but obviously any size will work.
Bake them for about 8 minutes (or until they loose their shape) in a 300' oven.
I put the molds onto a aluminum foil lined cookie sheet just to prevent spills.

Let them cool on the counter for about 15 minutes and then put them in the freezer for another 15-20 minutes until hardened. Then just pop them out.  

Put them in cello bags or package them together with some coloring books for a cute gift.
We are just giving each child one in my son's class for a Valentines day favor.
It cost me next to nothing to make, they kids got to make them themselves & in my opinion they are so much better than all that CANDY they get!

Enjoy!!!


Thursday, February 10, 2011

ORGANIZATION: The Landing Pad Week #2

Week #2: The Landing Pad

This weeks challenge is the Landing Pad. This is an area that is a constant struggle for us right now. We live in MN. Which means Cold, Snow, Wet. Which means lots of extra stuff: Snow boots, Snow pants, Bulky winter jackets, scarves, mittens, hats. And unfortunately all this extra gear takes up some major real estate.

This is my current "Landing Pad".


Although this is the area I would prefer the backpacks, boots, snow pants & coats be hung....

This is where they usually end up, right at the top of my stairs in my living room. : (

I do plan on changing this VERY SOON. A place that they can keep their backpacks and all the coats, shoes & boats. A place for my purse, keys, etc.

Here is what I am dreaming about:
This one was done by Censational Girl. Check it out HERE.

I love the phrase and use of eclectic letters on the one wall, and the pop of red on the other!

Image by Pottery Barn Kids

Image by Pottery Barn Kids

Not sure where this one came from?

Or this one...but don't you just love the rustic feel of the stone wall & floor! It feels so cozy & natural to me!

This one was featured over at IHeart Organizing! Check it out HERE!

So this is what I plan on doing to change it! (Hopefully soon!!)

This is one of Ana White's (Knock Off Wood) plans! If you haven't heard of Ana White or Knock Off Wood you need to go check it out NOW!!!! No seriously! She has hundreds of plans in her catalog that are inspired by all our FAVORITE designer brands such as Pottery Barn, Pottery Barn Kids, Ballard Designs, and many others. If you aren't afraid to try, she gives everyone (even us women) the confidence to try our hands at woodworking & succeed! Here is my first project of many I created with her plans & encouragement that I got from her blog!

I have a ton of projects of hers on my future "To Do List", but this is definitely one on the top of my list.

What do you think? What do your "Dream" Landing pads look like? Maybe you already have the "Landing Pad" of your dreams!
Please share your inspirations!

Enjoy!!!

I am linking to these FABULOUS Parties: