Thursday, September 30, 2010

Laundry Room Redo

OK, I totally thought I had already taken a BEFORE photo to show you the differences, but for the life of me I can't find it anywhere! It was taken prior to my new computer so maybe it got lost in the shuffle. :(
Oh well, what can I do.

Well here it is. I freshened up my laundry room after I got a couple new additions. A new front loader washer & dryer (well new to me! I can actually Thank my step brother Josh for hooking me up with this find.)
And since I had a front loader now, I needed a pedestal to put them on & I am sorry but I wasn't paying $200 smackers a piece for the store bought kind. So I built me a beautiful,
handcrafted one out of solid wood for around $50.

Let's start this post with the pedestal building:

Some of the lumber.

The top of the frame.


OK, the GRAND REVEAL:

Here's the finished pedestal! I LOVE how it turned out! I will actually ENJOY doing laundry!!! If only I had someone to fold & put it all away! (I hate that part!) :)

The other half of the laundry room. See that laundry sink...the top is just the portion that you cut out of the counter top installation when you install a new sink. (*It was left here at our house when we bought it...it was the lovely color of are old counter tops in my kitchen...one day I will get around to showing you are HUGE house remodel) It gives me some extra countertop space when needed.


View from the door.
Those shelves house my canned goods & canning supplies.
Along with some other misc. stuff.

Accessories!

See the Burgundy Red Laundry print...(Ballard House inspired). I got it here for FREE!
You can get it in 8 different colors too! And they even have some for your Bathroom. I just popped it in a previous frame I had & I had more Laundry Room ART!
You can thank Aimee over @ Sprik Space for those awesome prints! THANKS Aimee!


Here is the inspiration for building those pedestals:

Kristie & Kevin (AKA Romeo) over at Stories of a House had this post.
 &
Sausha over at Show and Tell had this post & awesome Tutorial which my husband used for most of the build. He tweaked it a bit to fit our needs.

So that is our laundry room in a nutshell. (there is a back half of this room...it is just WAAAAAY TOO cluttered & disorganized to show the world quite yet...oh the shame!)

Enjoy!

I am linking up to:


Organize with Sandy button

Wednesday, September 29, 2010

Featured Again!

Kara over at Creations by Kara Featured my "Heirloom Family Table Makeover" for her "Look What I Made" linky party!
Go over and check it out here. And while your there, check out Kara's blog & become a Follower. She's got some pretty cool ideas over there!


Creations by Kara


DIY Cloche

I got the inspiration for this project from Allison over at House of Hepworth's HOH. Her blog is AWESOME. You need to check it out now & becoming a follower if you aren't following already. I literally saw this post & thought how cool! Now I just have to find a cheese dome to do it! :)
The very next week, I was wasting time meandering around my local salvation army and I found one! PURE JOY at a $3.00!!!!
BEFORE


I also found a little wooden candlestick that day for 50 cents.

I got my supplies all together & my trusty Gorilla Glue.
I cleaned up my candlestick & cheese dome.
Then glued the two together with the Gorilla Glue.
After the glue dried I just spray painted it with Black spray paint & WHOLA!
AFTER

Enjoy!!!


Tuesday, September 28, 2010

Halloween Potion & Specimen Jars

These potions jars have been so fun to make! My son's have really enjoyed helping me come up with what to put inside them & displaying them. I will try & be precise to what we put in them, as well as where we got the materials used in them.
-All the jars are recycled from jams, jelly, pickles, salsa, vinegar, olives, etc. bottles. All the lids were spray painted with flat black spray paint.

Here they are all displayed together:


-Most of the labels came from Love Manor's Flicker page. I just downloaded them & re sized them as necessary and printed them out on regular computer printer paper. This guy is genius! They are all unique & look VERY CONVINCING!

-The "Eye of Newt" Labels came from Martha Stewart here.

-The 2 Specimen Labels I just made in Microsoft Word using "Carbon Type" font. I then crumpled up the paper after they printed and distressed them so they looked old with stamp ink.
Inspiration for these 2 came from here.

I then took Rubber Cement and gave them a good coat on the front. Once that dried, I then rubber cemented the backs to the jars. I used Rubber band to keep them in place while they dried. Since I used a ink jet printer to print my labels I used the Rubber cement to keep the ink from bleeding/running if they got wet.

HUMAN FLESH JAR:
I got the "severed fingers" from the Dollar Tree. They were 5 fingers for a buck. I painted the nails on some of them to make them look a bit more realistic. Some with red nail polish & some I just used a black sharpie to color the nail. I filled the jar with water & added 3 drops of red food coloring.


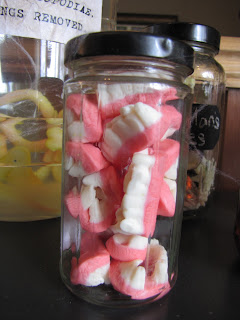
VAMPIRE FANGS JAR:
I got these "Gummy Vampire Fangs" from the Dollar Tree. There were about 14 in a package.


EARTH WORMS JAR:
I got these "Gummy Worms" from the Dollar Tree. I only used the Red/Yellow & Orange/Clear ones. I let my sons eat the Green/Red ones.


EYEBALLS JAR:
I got these "Sticky Goo Eyeballs" from Target. They were $4 a bag for 30 which I thought was kinda steep but I really wanted eyes of some sort. I wanted non-food ones so they will keep for future years.

BAT SKELETONS JAR:
I got these "Rubber Toy Bats" at the Dollar Tree in the toy section. They were 6 in a package. I only used 4 in my jar, added some water & 2 drops of red food coloring.

VAMPIRE BLOOD JAR:
This is just a small vinegar bottle with water & lots of red food coloring in it.

WITCH HAZEL BOTTLE:
This is just a sweet & sour bottle with water & green food coloring in it.

 EYES OF NEWT BOTTLE:
This is a half of a bottle of "Decorative Accents" from the floral/craft area at the Dollar Tree (these are hydrating beads that are used in floral arrangements). They are clear, gel like beads. I then added green food coloring & they soaked up the color.


 SHRINKING MAN SPECIMEN JAR:
The little skeleton is from Target he was $2 and found in the Halloween section.
DEAD MAN'S BONES JAR:
The jar is leftover from my Chalkboard Paint Projects tutorial. This jar is made up of 3 different plastic skeletons that have broken due to my youngest son LOVING skeletons & playing with them until they break. All came from the Dollar Tree either this year or last. I just finished breaking them up and added all the pieces to the jar.

UNKNOWN SPECIMEN JAR:
This is just two "Grow Sea Life-Octopus" from the Target Dollar Spot. *This is a toy that basically expands/grows to 3 times it's original size when put in water.
This is only 24 hours in water. I am hoping it gets as big as the jar it is in after a few days.

The Frog Apothecary & Rat Apothecary are both from my Halloween Apothecary Display here. The rats I got at Walmart in their Halloween section for $2 & the frogs were from the Dollar Tree in the toy section.

The skull came from Menard's for $1.99 in their Halloween section. It is also fiber optic & turns several different colors. (*It's not on in the photos)
And the Cloche it is sitting on is a project I just finished and need to post about (suspense). But it was a Thrift store find for around $3.50 by the time I got done with it. Accessorized with some Spanish moss.


 I got inspiration for these "Specimen/Potion Jars" from several places.

Here are some of them:

The Idea Room's-Creepy Halloween Apothecary gave me some more inspiration.

Aranamuerta-Dead Spider's musings and makings
featured a "Witches Kitchen" post that was also inspiring! Check it out here: http://aranamuerta.com/2008/01/29/witches-kitchen

Hope you enjoyed this C~R~E~E~P~Y post!

I am linking up to:


HookingupwithHoH


Photobucket


Party Button